
Referred from various blogs and documentation. Adding here for quick reference.
C:\Oracle\Middleware\jdeveloper\ide\bin\ide.conf
###### HD Custom ######
C:\Oracle\Middleware\jdeveloper\jdev\bin\jdev.conf
C:\Users\\AppData\Roaming\JDeveloper\system11.1.1.7.40.64.93\DefaultDomain\bin\ setDomainEnv.cmd
Add
set USER_MEM_ARGS=-Xms512m -Xmx2g -XX:MaxPermSize=1g
C:\Oracle\Middleware\jdeveloper\ide\bin\ide.conf
###### HD Custom ######
AddVMOption -Xms512m
AddVMOption -Xmx2g
AddVMOption -XX:MaxPermSize=1g
C:\Oracle\Middleware\jdeveloper\jdev\bin\jdev.conf
###### HD Custom ######
AddVMOption -Xms512m
AddVMOption -Xmx2g
AddVMOption -XX:MaxPermSize=1g
AddVMOption -XX:+AggressiveOpts
AddVMOption -XX:+UseStringCache
AddVMOption -XX:+OptimizeStringConcat
#
# only since Java 6 update 21 performance release
# reduces memory consumption
# reducing memory addressing length overhead
#
AddVMOption -XX:+UseCompressedStrings
AddVMOption -XX:+ScavengeBeforeFullGC
AddVMOption -XX:+UseCompressedOops
#
# only for multi-core machines
#
AddVMOption -XX:+UseConcMarkSweepGC
AddVMOption -XX:+UseGCOverheadLimit
##### HD Custom END #####
Add
set USER_MEM_ARGS=-Xms512m -Xmx2g -XX:MaxPermSize=1g
I was reading Frank's article "How-to build a single select one choice component with images in the select item list" and wanted to share a method that we used to achieve similar result without a custom component.
The secret Menu and menu items.
Download the sample application from here.
To run the application add ADFUtils.java file to the app. It runs on HR schema.
In the sample application the state field is created using a menu. and the select items are created as commandMenuItems.
The advantage of using menu is we get whole list of features thats available with menu like grouping, sub menus, floating menus, images, shortcuts etc
The Menu items text property is bound to VO attribute #{bindings.StateProvince.inputValue}
Each commandMenuItem has an actionListener pointing to a backing bean method that sets the value of StateProvince attribute.
That's it. Heres how the final output looks like:

Its a frequent requirement to default the first value of LOV when a new record is created.
Heres how to make it happen: DOWNLOAD
In the following example when a new department is created the first location is defaulted. User can then change location. This example can be extended to default only in certain conditions.
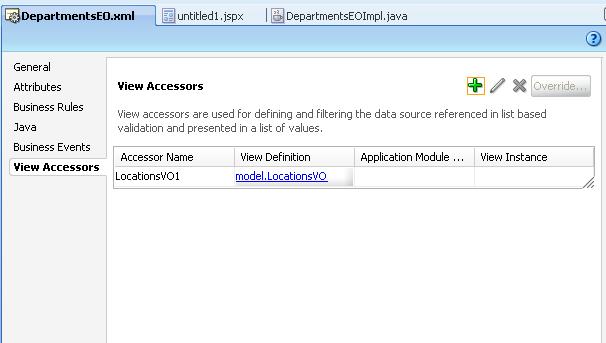
DepartmentEO:
Now since all business logic is in EO the logic needs to be written in EO.
The VO that we would create for LOV on locationId attribute is added as accessor in DepartmentsEO.
On LocationId add the groovy expression as follows.

The main logic is in the defaultLocationId() where we use the accessor VO to get the first record and set its locationId
public Number defaultLocationId() {
Number locId = (Number)getAttributeInternal(LOCATIONID);
if (locId == null) {
LocationsVORowImpl locRow = (LocationsVORowImpl)getLocationsVO1().first();
if (locRow != null) {
locId = locRow.getLocationId();
}
}
return locId;
}
DepartmentsVO:
Create a LOV on locationId attribute. Notice that the view accessor on EO is visible in VO and can be used on LOV.

Page:
Create a new page with a form based on DepartmentsVO. Also drop CreateNew, Commit and Rollback actions as buttons.

Thats it the groovy expression will do the trick.

Its always a requirement to display a 'Name' for an attribute and insert 'Value' into the DB table. Creating singleOneChoice is made extremely simple in ADF and it shows Display Name to user but stores internal value in database. However when using inputListOfValues or inputComboboxListOfValues it only brings back the value so we cannot search the 'Name'.
Following screenshots show something we dont usually need:


For example in case of HR schema Employees table we need to search & add the manager name but enter managerId into table.
This is how I implemented the solution: DOWNLOAD
- Create a new update-able transient attribute say ManagerName in the EmployeesView.

- Create a new read-only VO to fetch manager name and id

- Add the manager LOV on ManagerName attribute. Make mappings to return ManagerName and ManagerId. Make List Type as "Input Text with List of Values"


- Now the important step: In the EmployeesViewRowImpl add the following code to getManagerName() method:
- public String getManagerName() {
Object mgrId = getAttributeInternal(MANAGERID);
String managerName = null;
if(mgrId != null) {
Object[] obj = {mgrId};
Key key = new Key(obj);
Row[] rows = getManagersVO1().findByKey(key, 1);
if(rows != null && rows.length > 0) {
managerName = (String)rows[0].getAttribute(1);
}
}
return managerName;
} - The above code basically gets the ManagerName from the Manager LOV for the current ManagerId.
- Now when we drop the EmployeesView on page it creates a LOV for ManagerName. Set AutoSubmit = true to make show LOV window on tab out.

- Just for display I have also added ManagerId column on page. Add partialTrigger to point to ManagerName column.
- Run the page to test the application.


There are numerous occasions where we need to display checkbox whose value isnt just true/false. eg Y/N, Active/Inactive etc
With the use of LOV feature ADF makes our lives easy when creating dropdowns, LOV etc. Infact this same mechanism can be used to create checkboxes when only 2 possible values exists.
The demo of this and several other features can be found in the LookupCodeApp.
Use the following steps:
- Create a simple VO that queries the checkbox values. Lets say YesNoRVO
- Make sure the query fetches the checked value first. i.e If Y is the value to be inserted when checkbox is checked then Y must be the first query result. The simplest way to do this is using order-by clause.

- Open the desired VO and select the attribute that needs to be displayed as a checkbox.

- Create a List of values on the field using YesNoRVO (Checkbox values VO)

- In UI hints tab Leave the "List Type" as it is.
- Make sure that "Display Attribute" is the "value" attribute too. This is necessary in cases where the attribute in main VO is of limited size. eg. DisabledFlag is of type varchar(1)

- Now for the MOST IMPORTANT change from normal LOV: (Drum roll please...) In the main VO attribute's UI Hints, change the "Control Type" to checkbox.


- The best advantage of this approach is that it can be tested in the Application Module tester as well.
- Ofcourse it is re-usable as all checkboxes with Y/N values can use the same YesNoRVO and there is no hard coding necessary.

ADF offers the Dashboard component for arranging a set of portlets (panel boxes, headers, tabs etc) in a grid format. A good demo is found here: http://jdevadf.oracle.com/adf-richclient-demo/faces/components/panelDashboard.jspx
It is the preferred choice of layout when displaying multiple pieces of information in a page.
In our case we have multiple pages that require this component. However the dashboard component in itself is very limited in functionality.
The demo http://jdevadf.oracle.com/adf-richclient-demo/faces/visualDesigns/dashboard.jspx provides a "richer" dashboard with interface similar to yahoo homepage.
What I have done here is to use the most important features of the above demo and made a generic declarative component out of it. It can be downloaded from here.
The declarative component offers the following features:
For Developers:
1. A simple customizable component. Developer can customize number of portlets displayed, whether side-bar is displayed and ofcourse the content of portlets.
2. Developer only needs to drop the component in his page and add header attributes for only the portlets that need to be displayed.
3. All content can be developed independently as page fragments and then dropped into facets offered by the component.
For Users:
1. Ability to minimize some or all portlets
2. Ability to re-order portlets.
3. Ability to change portlet size


Every application requires the use of LOV (List of values) for selection and data entry. ADF provides a highly declarative way to construct LOV in the ADF-BC layer.
However there remains a challenge to store and maintain lookup codes. It is seldom a good practice to store different lookups in different tables.
Below I have tried to create a sample application that could be used as a guideline for creating lookup maintenance and usage apps.
It has the following features:
Search Lookups, Create/Edit Types and Codes (obviously).
Ability to (optionally) set translated display values.
Ability to define parent-child relationships between codes. eg country & state.
Ability to (optionally) define & use additional attributes to lookups. eg. country could have attribute 'area'.
Ability to define some lookups as 'reserved' against modifications.
The application can be downloaded from here
Setup
I have used JDeveloper 11gR1PS1 but of course ADF 10g and up can be used in similar fashion.
Create the tables using the table_create.sql file in model.lookup.common.diagram package.
Also insert lookup types for Language, YesNo and Validation Method. These are used for creating lookups.
Lookup Maintenance
The package model.lookup.common in the Model project contains the EO, VO and AM for maintenance of types, codes, translations and attributes.
To test the maintenance screens run the CodeSearch page in adfc-config.xml. In reality these 3 pages should be in a separate task flow.
Lookup Usage
There are different ways to use the lookups created:
1. Create different VOs for different lookup types. This approach of course has a disadvantage of repeating the same query in different VO. It is however useful in some cases where a unique way of querying is needed.
eg YesNoCheckboxVO. It is created as separate VO since we needed value 'Y' before 'N' (without bothering about translations). Hence its query contains a order by clause.
2. Create a common VO with parameters for Type, LangCode and optionally ParentCode. eg. LookupCodesRVO. Then while using, set the parameters in AM instance.
3. Create a common VO and then create View Criteria for each lookup type. This way while using, developers dont need to remember the lookup type and they can simply choose the lookup criteria they want. However the disadvantage is every new lookup we create, we need to add a view criteria too.
The page Home.jspx contains a couple of more examples that show how to use parent child lookups are used.
Please note that this application is not 100% bug free. Plus there are many other enhancements possible. Do leave a note if you find bugs.
Subscribe to:
Posts (Atom)