
Referred from various blogs and documentation. Adding here for quick reference.
C:\Oracle\Middleware\jdeveloper\ide\bin\ide.conf
###### HD Custom ######
C:\Oracle\Middleware\jdeveloper\jdev\bin\jdev.conf
C:\Users\\AppData\Roaming\JDeveloper\system11.1.1.7.40.64.93\DefaultDomain\bin\ setDomainEnv.cmd
Add
set USER_MEM_ARGS=-Xms512m -Xmx2g -XX:MaxPermSize=1g
C:\Oracle\Middleware\jdeveloper\ide\bin\ide.conf
###### HD Custom ######
AddVMOption -Xms512m
AddVMOption -Xmx2g
AddVMOption -XX:MaxPermSize=1g
C:\Oracle\Middleware\jdeveloper\jdev\bin\jdev.conf
###### HD Custom ######
AddVMOption -Xms512m
AddVMOption -Xmx2g
AddVMOption -XX:MaxPermSize=1g
AddVMOption -XX:+AggressiveOpts
AddVMOption -XX:+UseStringCache
AddVMOption -XX:+OptimizeStringConcat
#
# only since Java 6 update 21 performance release
# reduces memory consumption
# reducing memory addressing length overhead
#
AddVMOption -XX:+UseCompressedStrings
AddVMOption -XX:+ScavengeBeforeFullGC
AddVMOption -XX:+UseCompressedOops
#
# only for multi-core machines
#
AddVMOption -XX:+UseConcMarkSweepGC
AddVMOption -XX:+UseGCOverheadLimit
##### HD Custom END #####
Add
set USER_MEM_ARGS=-Xms512m -Xmx2g -XX:MaxPermSize=1g
I was reading Frank's article "How-to build a single select one choice component with images in the select item list" and wanted to share a method that we used to achieve similar result without a custom component.
The secret Menu and menu items.
Download the sample application from here.
To run the application add ADFUtils.java file to the app. It runs on HR schema.
In the sample application the state field is created using a menu. and the select items are created as commandMenuItems.
The advantage of using menu is we get whole list of features thats available with menu like grouping, sub menus, floating menus, images, shortcuts etc
The Menu items text property is bound to VO attribute #{bindings.StateProvince.inputValue}
Each commandMenuItem has an actionListener pointing to a backing bean method that sets the value of StateProvince attribute.
That's it. Heres how the final output looks like:

Its a frequent requirement to default the first value of LOV when a new record is created.
Heres how to make it happen: DOWNLOAD
In the following example when a new department is created the first location is defaulted. User can then change location. This example can be extended to default only in certain conditions.
DepartmentEO:
Now since all business logic is in EO the logic needs to be written in EO.
The VO that we would create for LOV on locationId attribute is added as accessor in DepartmentsEO.
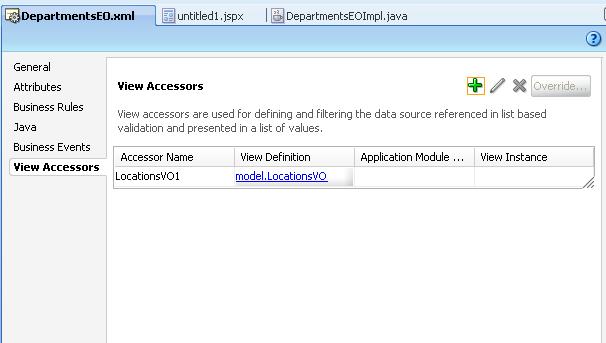
On LocationId add the groovy expression as follows.

The main logic is in the defaultLocationId() where we use the accessor VO to get the first record and set its locationId
public Number defaultLocationId() {
Number locId = (Number)getAttributeInternal(LOCATIONID);
if (locId == null) {
LocationsVORowImpl locRow = (LocationsVORowImpl)getLocationsVO1().first();
if (locRow != null) {
locId = locRow.getLocationId();
}
}
return locId;
}
DepartmentsVO:
Create a LOV on locationId attribute. Notice that the view accessor on EO is visible in VO and can be used on LOV.

Page:
Create a new page with a form based on DepartmentsVO. Also drop CreateNew, Commit and Rollback actions as buttons.

Thats it the groovy expression will do the trick.

Its always a requirement to display a 'Name' for an attribute and insert 'Value' into the DB table. Creating singleOneChoice is made extremely simple in ADF and it shows Display Name to user but stores internal value in database. However when using inputListOfValues or inputComboboxListOfValues it only brings back the value so we cannot search the 'Name'.
Following screenshots show something we dont usually need:


For example in case of HR schema Employees table we need to search & add the manager name but enter managerId into table.
This is how I implemented the solution: DOWNLOAD
- Create a new update-able transient attribute say ManagerName in the EmployeesView.

- Create a new read-only VO to fetch manager name and id

- Add the manager LOV on ManagerName attribute. Make mappings to return ManagerName and ManagerId. Make List Type as "Input Text with List of Values"


- Now the important step: In the EmployeesViewRowImpl add the following code to getManagerName() method:
- public String getManagerName() {
Object mgrId = getAttributeInternal(MANAGERID);
String managerName = null;
if(mgrId != null) {
Object[] obj = {mgrId};
Key key = new Key(obj);
Row[] rows = getManagersVO1().findByKey(key, 1);
if(rows != null && rows.length > 0) {
managerName = (String)rows[0].getAttribute(1);
}
}
return managerName;
} - The above code basically gets the ManagerName from the Manager LOV for the current ManagerId.
- Now when we drop the EmployeesView on page it creates a LOV for ManagerName. Set AutoSubmit = true to make show LOV window on tab out.

- Just for display I have also added ManagerId column on page. Add partialTrigger to point to ManagerName column.
- Run the page to test the application.


There are numerous occasions where we need to display checkbox whose value isnt just true/false. eg Y/N, Active/Inactive etc
With the use of LOV feature ADF makes our lives easy when creating dropdowns, LOV etc. Infact this same mechanism can be used to create checkboxes when only 2 possible values exists.
The demo of this and several other features can be found in the LookupCodeApp.
Use the following steps:
- Create a simple VO that queries the checkbox values. Lets say YesNoRVO
- Make sure the query fetches the checked value first. i.e If Y is the value to be inserted when checkbox is checked then Y must be the first query result. The simplest way to do this is using order-by clause.

- Open the desired VO and select the attribute that needs to be displayed as a checkbox.

- Create a List of values on the field using YesNoRVO (Checkbox values VO)

- In UI hints tab Leave the "List Type" as it is.
- Make sure that "Display Attribute" is the "value" attribute too. This is necessary in cases where the attribute in main VO is of limited size. eg. DisabledFlag is of type varchar(1)

- Now for the MOST IMPORTANT change from normal LOV: (Drum roll please...) In the main VO attribute's UI Hints, change the "Control Type" to checkbox.


- The best advantage of this approach is that it can be tested in the Application Module tester as well.
- Ofcourse it is re-usable as all checkboxes with Y/N values can use the same YesNoRVO and there is no hard coding necessary.


ADF offers the Dashboard component for arranging a set of portlets (panel boxes, headers, tabs etc) in a grid format. A good demo is found here: http://jdevadf.oracle.com/adf-richclient-demo/faces/components/panelDashboard.jspx
It is the preferred choice of layout when displaying multiple pieces of information in a page.
In our case we have multiple pages that require this component. However the dashboard component in itself is very limited in functionality.
The demo http://jdevadf.oracle.com/adf-richclient-demo/faces/visualDesigns/dashboard.jspx provides a "richer" dashboard with interface similar to yahoo homepage.
What I have done here is to use the most important features of the above demo and made a generic declarative component out of it. It can be downloaded from here.
The declarative component offers the following features:
For Developers:
1. A simple customizable component. Developer can customize number of portlets displayed, whether side-bar is displayed and ofcourse the content of portlets.
2. Developer only needs to drop the component in his page and add header attributes for only the portlets that need to be displayed.
3. All content can be developed independently as page fragments and then dropped into facets offered by the component.
For Users:
1. Ability to minimize some or all portlets
2. Ability to re-order portlets.
3. Ability to change portlet size


Every application requires the use of LOV (List of values) for selection and data entry. ADF provides a highly declarative way to construct LOV in the ADF-BC layer.
However there remains a challenge to store and maintain lookup codes. It is seldom a good practice to store different lookups in different tables.
Below I have tried to create a sample application that could be used as a guideline for creating lookup maintenance and usage apps.
It has the following features:
Search Lookups, Create/Edit Types and Codes (obviously).
Ability to (optionally) set translated display values.
Ability to define parent-child relationships between codes. eg country & state.
Ability to (optionally) define & use additional attributes to lookups. eg. country could have attribute 'area'.
Ability to define some lookups as 'reserved' against modifications.
The application can be downloaded from here
Setup
I have used JDeveloper 11gR1PS1 but of course ADF 10g and up can be used in similar fashion.
Create the tables using the table_create.sql file in model.lookup.common.diagram package.
Also insert lookup types for Language, YesNo and Validation Method. These are used for creating lookups.
Lookup Maintenance
The package model.lookup.common in the Model project contains the EO, VO and AM for maintenance of types, codes, translations and attributes.
To test the maintenance screens run the CodeSearch page in adfc-config.xml. In reality these 3 pages should be in a separate task flow.
Lookup Usage
There are different ways to use the lookups created:
1. Create different VOs for different lookup types. This approach of course has a disadvantage of repeating the same query in different VO. It is however useful in some cases where a unique way of querying is needed.
eg YesNoCheckboxVO. It is created as separate VO since we needed value 'Y' before 'N' (without bothering about translations). Hence its query contains a order by clause.
2. Create a common VO with parameters for Type, LangCode and optionally ParentCode. eg. LookupCodesRVO. Then while using, set the parameters in AM instance.
3. Create a common VO and then create View Criteria for each lookup type. This way while using, developers dont need to remember the lookup type and they can simply choose the lookup criteria they want. However the disadvantage is every new lookup we create, we need to add a view criteria too.
The page Home.jspx contains a couple of more examples that show how to use parent child lookups are used.
Please note that this application is not 100% bug free. Plus there are many other enhancements possible. Do leave a note if you find bugs.
As we know BI Publisher is one of the best reporting tools available in the market. It is integrated with E-business suite (using OA Framework) and PeopleSoft products hence creating data for reports easy. However ADF 11g does not come with an integrated BI Publisher support.
OBIEE (Oracle BI Enterprise) provides different ways to call reports from external applications including ADF. This blog by Venkatakrishnan J explains it thoroughly: http://oraclebizint.wordpress.com/2008/01/28/oracle-bi-ee-101332-integration-into-external-applicationsportals/
However my client has an application in ADF and needed an approach where existing pages can call reports using existing queries written in View Objects.
The idea here is to make the integration generic enough so that any page can use it to generate report.
The sample application can be downloaded from here
Step 1: Environment setup
The idea here is to make the integration generic enough so that any page can use it to generate report.
The sample application can be downloaded from here
Step 1: Environment setup
- The following solution is applicable for both ADF 10g and 11g. I am using ADF 11g installed from http://download.oracle.com/otn/java/jdeveloper/111/jdevstudio11111install.exe
- Install BI Publisher Desktop from http://download.oracle.com/otn/nt/ias/101341/bipublisher_desktop_windows_x86_101341.zip
- Install Oracle XE and configure HR schema. Download Oracle XE from http://download.oracle.com/otn/nt/oracle10g/xe/10201/OracleXE.exe
- Create a new application "Fusion Web Application (ADF)" Call it "BIIntegrationApp"
- Copy the jar files from \BI Publisher Desktop\Template Builder for Word\jlib into \BIPIntegrationApp\Model\lib folder. Following the the most important files needed :
· xmlparserv2-904.jar
· collections.jar
· i18nAPI_v3.jar
· versioninfo.jar
Step 2: Model Project
- Right click the “Model” project and go to "Project Properties" > “Libraries and Classpath”. Click on “Add Jar/Directory” and add all the jar files from Model/lib folder .

- Create a new Database connection to HR schema of Oracle XE db.

- Create Business Components using “Business Components from Tables”
Select "Employees" and "Departments" tables for creating Entity Objects. Also create default view objects and Default Application Module.
Delete the View Links DeptMgrFkLink and EmpManagerFkLink since we wont be using them. We need a simple relation between Department and Employee in our report.

- Next we create a layer of ADF extension classes to put generic code used for report generation. Since the XML data is generated from VO, lets extend the ViewObjectImpl.
Create a new Java class “model.base.BaseViewObjectImpl” which extends “oracle.jbo.server.ViewObjectImpl”
- In the BaseViewObjectImpl we will add at least 2 methods getXMLData() and getReport(). {Other overridden methods can be added to pass different parameters}
getXMLData() will generate XML representation of the View Object Data
public byte[] getXMLData() {
byte[] dataBytes = null;
try {
ByteArrayOutputStream outputStream = new ByteArrayOutputStream();
//The following statement will generate xml representation of the view data.
//the first param of writeXML takes the number of levels of child nodes to consider.
//the entire xml is then printed into the outputStream.
((XMLNode)writeXML(4, XMLInterface.XML_OPT_ALL_ROWS)).print(outputStream);
//Simple and Dirty way to generate sample XML data is to print the outputStream to log
//Then copy the data into xml file.
//However it will not be possible to generate large xml file in this way
System.out.println(outputStream.toString());
//The reason we convert to byte[] is that outputStream is not serializable
//while byte[] is serializable and can be used in client class when needed.
dataBytes = outputStream.toByteArray();
} catch (IOException e) {
System.out.println(e.getMessage());
} catch (Exception e) {
System.out.println(e.getMessage());
}
return dataBytes;
}
- getReport() is the main method that takes the xml data and template file from parameter and converts it into the report of desired format.
Although I am passing the template path and filename, the logic can be modified to fetch the template from database. (that will be in some other post.)
/**
getReport method obtains the xml data of the view object and combines it with the template passed to it.
It then converts the report in the desired format and returns the byte[] array.
*
The reason byte[] is passed instead of OutputStream is that OutputStream is not serializable.
*
@param templateFile: File Name with Path of the RTF template file.
@param outFileType: eg HTML, PDF, RTF
*/
public byte[] getReport(String templateFile, String outFileType) {
byte[] dataBytes = null;
try {
//Process RTF template to convert to XSL-FO format
RTFProcessor rtfp = new RTFProcessor(templateFile);
ByteArrayOutputStream xslOutStream = new ByteArrayOutputStream();
rtfp.setOutput(xslOutStream);
rtfp.process();
//Use XSL Template and Data from the VO to generate report and return the OutputStream of report
ByteArrayInputStream xslInStream = new ByteArrayInputStream(xslOutStream.toByteArray());
FOProcessor processor = new FOProcessor();
ByteArrayInputStream dataStream = new ByteArrayInputStream(getXMLData());
processor.setData(dataStream);
processor.setTemplate(xslInStream);
ByteArrayOutputStream pdfOutStream = new ByteArrayOutputStream();
processor.setOutput(pdfOutStream);
byte outFileTypeByte = FOProcessor.FORMAT_PDF;
if ("HTML".equalsIgnoreCase(outFileType)) {
outFileTypeByte = FOProcessor.FORMAT_HTML;
}
processor.setOutputFormat(outFileTypeByte); //FOProcessor.FORMAT_HTML
processor.generate();
dataBytes = pdfOutStream.toByteArray();
} catch (IOException e) {
e.printStackTrace();
System.out.println("IOException when generating pdf "+ e);
} catch (XDOException e) {
e.printStackTrace();
System.out.println("XDOException when generating pdf "+ e);
}
return dataBytes;
}
- Next we will inherit these methods in DepartmentView by extending BaseViewObjectImpl.
Open the DepartmentsView (View Object), Select the Java tab. Select Generate View Object Class. Also select “Extends button” and extend Object from “BaseViewObjectImpl”

- In the “DepartmentsViewImpl” add the following code. It will use the getReport() from base class. This code is not necessary if we plan to pass templatePath from UI directly.
public byte[] getReport(String format) {
//Some complex logic to derive the template path based on language, customer type etc..
String templatePath = "C:\tmp\template1.rtf";
return getReport( templatePath, format);
}
- Now create a client interface for DepartmentsView and shuttle in getReport(String). Only this method will be visible in Data Control later.

- Compile the model project. Resolve compilation errors if any.
- At this point its a good idea to run the Application Module and run the method getReport() to check if it generates the report. We will be able to download the report later once UI project is complete.
- Create a new JSF Page. Name the page DepartmentEmployees.jspx. Do NOT create backing bean, we will create a managed bean.

- Select the getReport(String) method from Data Controls Panel > DepartmentsView1 . Drag it and drop on the page as ADF Parameter Form.

It will create a Textbox that is bound to the parameter of the method. The value entered in the textbox will be passed to getReport() method.

- You will see it generates a textbox and a button “getReport”. If you run the page and press the button, it will execute the method in VO but not display the report result.
- For the textbox set the AutoSubmit property to 'true'. Ideally this is not needed but since we will add a file download listener, it wont set the values when button is clicked.
- In order to download the report, Select “File Download Action Listener” from Component Palette and drop on the “getReport button”.

- Select the “File Download Action Listener” and in the Property Inspector select the “Edit” next to “Method” property. It will ask to create a new Managed Bean and Handler Method.
{Note that we can give ContentType and Filename here if it is constant. Even if we do not give these it will work fine except the report will open in the same page instead of giving a download dialog.}

- Click on the New.. next to Managed Bean Dropdown and create a new java class “view.report.ReportDownloader”
Then create a new Method “handleDeptReportDwd” and press Ok.

- Open the ReportDownloader.java and add the following code. It is a generic code (Thanks to Steve Muench) that calls a method from data binding and returns it result.
/**
This example illustrates does not specifically set any
method action parameter values, so the parameter values
are picked up from the EL expressions configured on the
method action binding arguments in the page definition
metadata.
http://blogs.oracle.com/smuenchadf/examples/#152
*/
public Object executeMethodWithResult(String methodActionId) {
BindingContainer bindings = BindingContext.getCurrent().getCurrentBindingsEntry();
OperationBinding operationBinding = bindings.getOperationBinding(methodActionId);
Object result = operationBinding.execute();
if (!operationBinding.getErrors().isEmpty()) {
throw new RuntimeException("Error while executing.. "+operationBinding.getErrors());
}
return result;
}
- Add the following code to handleDeptReportDwd(). It simply calls the above util method and passes getReport which is id of methodAction tag in DepartmentEmployeesPageDef.xml
public void handleDeptReportDwd(FacesContext facesContext, OutputStream outputStream) {
try {
Object result = executeMethodWithResult("getReport");
outputStream.write((byte[])result);
} catch (IOException e) {
System.out.println("Exception "+e);
}
}
Step 4: BI Publisher Template
- The Only reason we didn’t create it earlier was because we needed to get the data xml. And now we can get the data xml by running the DepartmentEmployees page.
- To get the xml, go to the DepartmentsView and open its client Interface and shuttle in getXMLData method.

- Next open DepartmentEmployees page and drop in the getXMLData() from DataControl and drop it as button. Run the page.

- Since we put the System.out.println() in getXMLData() method, when we execute that method from the page, it will print the xml data in log file. (If your xml file is big, add a “File Download Action Listener” to this button and write another method to download)
- Copy the xml data and save it in a file depts.xml.
- Create a new RTF template with the depts.xml and save as DeptTemplate.rtf
Step 5: Run the application
- The only thing left is to change the path of template file in DepartmentsViewImpl.java and run the page.
- Run the page, enter "pdf" in the textbox and press getReport button to get the report.

- Enter "HTML" in textbox and click getReport to receive report in HTML format.

Using ADF 11g (should work in 10g as well)
There are many cases where we need to mark a row as deleted by setting a flag in database instead of physically deleting it. Fusion developers guide gives a way to achieve this http://download.oracle.com/docs/cd/E15051_01/web.1111/b31974/bcadveo.htm#CEGIBHBC.
However we needed to have this feature in almost all the table mandating a generic solution for soft delete.
The following code can be downloaded from here
Heres how I approached it:
There are many cases where we need to mark a row as deleted by setting a flag in database instead of physically deleting it. Fusion developers guide gives a way to achieve this http://download.oracle.com/docs/cd/E15051_01/web.1111/b31974/bcadveo.htm#CEGIBHBC.
However we needed to have this feature in almost all the table mandating a generic solution for soft delete.
The following code can be downloaded from here
Heres how I approached it:
- Create a new History Column for SoftDelete
- Create Base Class for Entity Implementation Object and override 2 methods of EntityObjectImpl: remove(), doDML()
- Create an application to test our work
Step 1: Create a new History Column - soft delete
- In Jdeveloper Tools > Preferences > Business Components > History Types. Add a new History Type "soft delete" with id 11 (Note that type id's 1-10 is reserved.

Step 2: Create Base EntityImpl class
- Create a new Fusion ADF Application and add a new java class that extends oracle.jbo.server.EntityImpl.

- In the BaseEntityImpl override the following methods:
- remove() - To set the value of column with History type 11 to deleted value.
- doDML() - During delete, to force an entity object to be updated instead of deleted. And during insert to default the value of column with History type 11 to active value.

private static final byte SOFT_DELETE_TYPE = 11;
public int getSoftDeleteColumn() {
int colIndex = -1;
for (AttributeDef def : getEntityDef().getAttributeDefs()) {
if (((AttributeDefImpl)def).getHistoryKind() == SOFT_DELETE_TYPE) {
colIndex = def.getIndex();
}
}
return colIndex;
}
@Override
public void remove() {
int deleteCol = getSoftDeleteColumn();
if(deleteCol != -1) {
setAttribute(deleteCol, "Y");
}
super.remove();
}
@Override
protected void doDML(int operation, TransactionEvent transactionEvent) {
int deleteCol = getSoftDeleteColumn();
if (EntityImpl.DML_DELETE == operation && deleteCol != -1) {
operation = DML_UPDATE;
}
if(EntityImpl.DML_INSERT == operation && deleteCol != -1) {
setAttribute(deleteCol, "N");
}
super.doDML(operation, transactionEvent);
}
Step 3: Now to the good stuff - Test the base class
- In Oracle XE HR schema add delete_flag to employees table.
- alter table employees
add delete_flag varchar2(1)
update employees
set delete_flag = 'N'
- Set the default base entityImpl class for the application using Application > Default Project Properties.

- Create business components (EO, VO & AM) for employees table.

- In the EmployeesEO set the history column for "DeleteFlag" to "soft delete".

- Run the Application Module to test insert and delete.

Using ADF 11g (ADF Faces & ADF-BC) and Oracle XE (HR Schema)
At a number of occasions I have had to create a Table that would allow user to add new rows from values of existing table. For eg. Consider creating an order by searching and adding a product. In these cases we generally create a popup for searching product and add selected products to Order.
At a number of occasions I have had to create a Table that would allow user to add new rows from values of existing table. For eg. Consider creating an order by searching and adding a product. In these cases we generally create a popup for searching product and add selected products to Order.
The source code can be downloaded from here
In this sample I will add employees from HR schema into a new table my_employees.
1. Create a new table in HR schema: my_employees
drop table my_employees
create table my_employees
(
id number primary key,
emp_id number,
creation_date date,
update_date date
)
create sequence my_employees_s
start with 1
increment by 1
2. In Model Project:
Create EO, Default VO and AM for tables employees and my_employees tables
Create AO between EmployeesEO and MyEmployeesEO. Also create Impl files for both EOs.
Create VL between EmployeesVO and MyEmployeesVO.

In this sample I will add employees from HR schema into a new table my_employees.
1. Create a new table in HR schema: my_employees
drop table my_employees
create table my_employees
(
id number primary key,
emp_id number,
creation_date date,
update_date date
)
create sequence my_employees_s
start with 1
increment by 1
2. In Model Project:
Create EO, Default VO and AM for tables employees and my_employees tables
Create AO between EmployeesEO and MyEmployeesEO. Also create Impl files for both EOs.
Create VL between EmployeesVO and MyEmployeesVO.

Add Name, email attributes to MyEmployeesVO from EmployeesEO to display Name and email of selected employees.

In the MyEmployeesEOImpl add the following code to create() method
protected void create(AttributeList attributeList) {
super.create(attributeList);
SequenceImpl seq = new SequenceImpl("MY_EMPLOYEES_S", getDBTransaction());
setId(seq.getSequenceNumber());
setEmpId((Number)attributeList.getAttribute("EmpId"));
//setEmpId(new Number(1));
}
Add VOImpl and VORowImpl to EmployeesVO & MyEmployeesVO. This will be used in AM while creating new rows.
In AppModuleAMImpl, create a method addSelectedEmployees(Key[] selectedEmp). WHY exactly the code uses Key[] will be clear once we create UI.
public void addSelectedEmployees(Key[] selectedEmp) {
for(Key key : selectedEmp) {
try {
//Either get the row using the key
//Or since in this case, Key is employeeId we can use key.getAttribute(1) as well
EmployeesVOImpl empVO = getEmployees1();
EmployeesVORowImpl empRow = (EmployeesVORowImpl)empVO.findByKey(key, 1)[0];
NameValuePairs nvp = new NameValuePairs();
nvp.setAttribute("EmpId", empRow.getEmployeeId());
MyEmployeesVOImpl myempVO = getMyEmployees1();
MyEmployeesVORowImpl myempRow = (MyEmployeesVORowImpl)myempVO.createAndInitRow(nvp);
myempVO.insertRow(myempRow);
} catch (Exception e) {
throw new JboException("Error in addSelectedEmployees "+e.getMessage());
}
}
}
In the client Interface screen of AM, add the method addSelectedEmployees in selected list. We create client interface for our method since we will call it from a ViewController via bindings.

At this point its good to execute the AM. However create new row for MyEmployees will not work since it wont get the EmpId.
3. So Next we turn our attention to ViewController project:
Create a page addEmployees.jspx.
All we will add to the page is a rich table for Myemployees and a popup containing query region for employees.
Add MyEmployees1 from Data Control to the page as read-only table. Enable the 'Row Selection' option

Surround table with a PanelCollection and add 2 buttons 'Add New' and 'Delete' on it.

Next we Add a popup dialog on the page and drop Employees1 as a query region on it.
Change the RowSelection for result table to 'multiple' & Note that the 'SelectedRowKeys' is empty while 'SelectionListener' has value #{bindings.Employees1.collectionModel.makeCurrent}
In order to open the popup, add showPopupListener on 'Add New' button and put popupId using 'Edit' dialog.
In order to delete, Grab Delete operation from MyEmployees1 data control and drop on Delete button.
Also add PartialTriggers of both buttons on the main table.
We can test our page at this point and it should display blank MyEmployees Table. Clicking on the Add New button will display popup and we can search employees. The selected employees however will not be added to MyEmployees. For that we need to add some code in managed bean to get selected employees and pass it to AM method that we created earlier. remember?

Go to page definition of addEmployees page. Add a new methodAction: addSelectedEmployees(Key[]) to bindings.

In the dialog listener property of af:dialog add a method #{EmployeeMgr.handleAddEmployee}. Create the managed bean EmployeeMgr if not present.
Add the following code to handleAddEmployee() method to get all the selected employees from the popup table.
public void handleAddEmployee(DialogEvent dialogEvent) {
// get all the selected attributes...
if(dialogEvent.getOutcome().equals(DialogEvent.Outcome.ok)) {
//Find the search results table and get all selected values
RichTable table = (RichTable)
findComponent(dialogEvent.getComponent(), "resId1");
RowKeySet set = table.getSelectedRowKeys();
System.out.println("Set of selected
"+set.getSize()+" "+set);
Iterator it = set.iterator();
Key[] keyList = new Key[set.getSize()];
int i = 0;
//Add all the selected Keys to array
while(it.hasNext()) {
Key key = (Key)((List)it.next()).get(0);
keyList[i++] = key;
}
//Pass the Keys as parameter to method
//addSelectedEmployees
Map
map.put("selectedEmp", keyList);
executeMethodWithParams("addSelectedEmployees", map);
//NOTE: following line refreshes the main page
AdfFacesContext.getCurrentInstance()
.addPartialTarget(findComponentInRoot("t1"));
}
}
Dont forget to drop the commit and rollback actions from DataControl onto the page to save the changes.
The final page will look like this:

I hope this is useful. I would surely appreciate your comments and issues in the project.
Subscribe to:
Posts (Atom)