
Showing posts with label LOV. Show all posts
Showing posts with label LOV. Show all posts
Its a frequent requirement to default the first value of LOV when a new record is created.
Heres how to make it happen: DOWNLOAD
In the following example when a new department is created the first location is defaulted. User can then change location. This example can be extended to default only in certain conditions.
DepartmentEO:
Now since all business logic is in EO the logic needs to be written in EO.
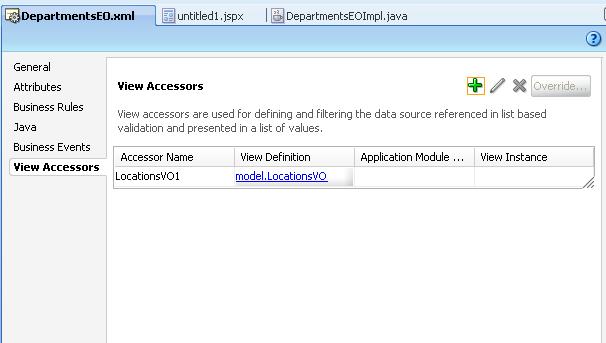
The VO that we would create for LOV on locationId attribute is added as accessor in DepartmentsEO.
On LocationId add the groovy expression as follows.

The main logic is in the defaultLocationId() where we use the accessor VO to get the first record and set its locationId
public Number defaultLocationId() {
Number locId = (Number)getAttributeInternal(LOCATIONID);
if (locId == null) {
LocationsVORowImpl locRow = (LocationsVORowImpl)getLocationsVO1().first();
if (locRow != null) {
locId = locRow.getLocationId();
}
}
return locId;
}
DepartmentsVO:
Create a LOV on locationId attribute. Notice that the view accessor on EO is visible in VO and can be used on LOV.

Page:
Create a new page with a form based on DepartmentsVO. Also drop CreateNew, Commit and Rollback actions as buttons.

Thats it the groovy expression will do the trick.

Its always a requirement to display a 'Name' for an attribute and insert 'Value' into the DB table. Creating singleOneChoice is made extremely simple in ADF and it shows Display Name to user but stores internal value in database. However when using inputListOfValues or inputComboboxListOfValues it only brings back the value so we cannot search the 'Name'.
Following screenshots show something we dont usually need:


For example in case of HR schema Employees table we need to search & add the manager name but enter managerId into table.
This is how I implemented the solution: DOWNLOAD
- Create a new update-able transient attribute say ManagerName in the EmployeesView.

- Create a new read-only VO to fetch manager name and id

- Add the manager LOV on ManagerName attribute. Make mappings to return ManagerName and ManagerId. Make List Type as "Input Text with List of Values"


- Now the important step: In the EmployeesViewRowImpl add the following code to getManagerName() method:
- public String getManagerName() {
Object mgrId = getAttributeInternal(MANAGERID);
String managerName = null;
if(mgrId != null) {
Object[] obj = {mgrId};
Key key = new Key(obj);
Row[] rows = getManagersVO1().findByKey(key, 1);
if(rows != null && rows.length > 0) {
managerName = (String)rows[0].getAttribute(1);
}
}
return managerName;
} - The above code basically gets the ManagerName from the Manager LOV for the current ManagerId.
- Now when we drop the EmployeesView on page it creates a LOV for ManagerName. Set AutoSubmit = true to make show LOV window on tab out.

- Just for display I have also added ManagerId column on page. Add partialTrigger to point to ManagerName column.
- Run the page to test the application.


There are numerous occasions where we need to display checkbox whose value isnt just true/false. eg Y/N, Active/Inactive etc
With the use of LOV feature ADF makes our lives easy when creating dropdowns, LOV etc. Infact this same mechanism can be used to create checkboxes when only 2 possible values exists.
The demo of this and several other features can be found in the LookupCodeApp.
Use the following steps:
- Create a simple VO that queries the checkbox values. Lets say YesNoRVO
- Make sure the query fetches the checked value first. i.e If Y is the value to be inserted when checkbox is checked then Y must be the first query result. The simplest way to do this is using order-by clause.

- Open the desired VO and select the attribute that needs to be displayed as a checkbox.

- Create a List of values on the field using YesNoRVO (Checkbox values VO)

- In UI hints tab Leave the "List Type" as it is.
- Make sure that "Display Attribute" is the "value" attribute too. This is necessary in cases where the attribute in main VO is of limited size. eg. DisabledFlag is of type varchar(1)

- Now for the MOST IMPORTANT change from normal LOV: (Drum roll please...) In the main VO attribute's UI Hints, change the "Control Type" to checkbox.


- The best advantage of this approach is that it can be tested in the Application Module tester as well.
- Ofcourse it is re-usable as all checkboxes with Y/N values can use the same YesNoRVO and there is no hard coding necessary.


Subscribe to:
Posts (Atom)